In this tutorial we demonstrate thermometer calibration procedure using simple laboratory equipment.
Equipment
- Metal base PS2030.27
- Metal support rod PS2030.28
- Metal rod with metal clamp PS2030.30
- 2 bosses PS2030.29
- Retort ring & gauze PS2030.31, PS2030.32
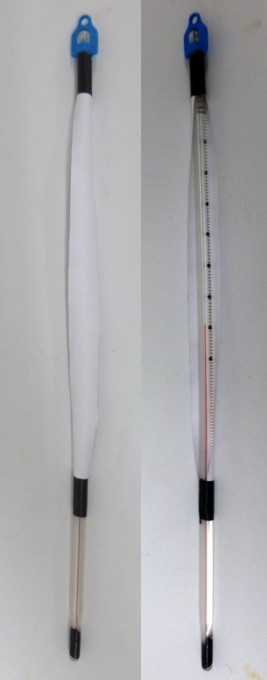
- Thermometer PS2030.24
- Glass beaker 400 ml PS2030.5
- Beaker clamp PS2030.15
- Alcohol burner PS2030.25
- Lighter CS3001.35
- Retractable ruler PS2021.18

Safety Note
No personal safety requirements for this experiment.
- Prepare a strip of white paper about 1.5 cm wide with sufficient length to cover the scale of the thermometer you use.

- Then, using two pieces of adhesive tape on the edges of the paper strip, wrap the thermometer to cover the Celsius scale but on the back you should be able to see the height of level of the liquid column, as shown in the photos.
- Set up the metal base with the metal clamp and the retort ring.

- Place the beaker with several ice cubes on the retort ring. Fix the thermometer very well with the metal clamp with its end (ie the bulb with the liquid that expands) to be in the ice.
During the ice melting phenomenon, the temperature is 0 °C
- Wait until the free end of the column of liquid is stabilized. Then, mark a line in the paper strip at the height of the liquid.

Caution: In the next step we will heat the water in the beaker. This shouldn’t be done abruptly, in order to avoid the destruction of the beaker. For example, after the melting of the ice allow water to reach room temperature.
- Light the alcohol lamp to heat the water. Observe the level of the liquid column of the thermometer.
- When the water starts boiling, observe that the level of the liquid is fixed at a certain position. In that position mark another line on the strip which symbolizes the 100° C.

- Turn off the alcohol burner. Then, remove carefully the thermometer from the beaker and the paper strip of the thermometer.
- Divide the line segment obtained between the points labeled 0° C and 100° C into ten equal portions, using the ruler. Thus, we determine the positions of 10° C, 20° C, …, 90° C.

- Insert the temperature sensor probe into the delivery tube. The water level will rise and it will appear to the tube. (Add a few drops of water if necessary).

Compare the position of 0 and 100 of the scale you created with 0 and 100 on the temperature scale. Observe that they are not the same, this is due to experimental errors. Also, it’s worth mentioning that the Celsius scale responds to atmospheric pressure of 1 atm.
Question 1
The measurement with the thermometer should be taken when the instrument reading is stabilized (thermal equilibrium restoration).
- True
- False
Question 2
Atmospheric pressure does not affect temperature.
- True
- False
Question 3
In Celsius thermometer the zero of the scale (0 °C) corresponds to the melting temperature of ice, the 100 (100 °C) to the boiling temperature of water. The intermediate distance of these is divided into 100 equal parts called “Celsius degrees”.
- True
- False
End of tutorial